
Build a Proof of Existence dApp (Solidity)
Objective
In this tutorial, we will walk through the whole process of building a full dApp, writing both the smart contract in Solidity and the front end in React. Again, we will be making the Proof of Existence App. For those unfamiliar with what Proof of Existence on blockchain is or have yet to go through the previous tutorial. Please take a look at the Proof of Existence background introduction.
The complete source code of this tutorial can be seen at our cess-examples repository.
Let's first look at the smart contract (Solidity) side and then the front-end side.
Smart Contract (Solidity)
Prerequisites
We will use Hardhat as the smart contract development toolchain. So, let's install and initialize hardhat library.
You will be asked a series of questions on configuring the project.
Hardhat default to be using npm package manager, but feel free to use your preferred package manager.
Let's also add hardhat-deploy library to help deploy and manage the deployed smart contracts.
By default, Hardhat places a Lock.sol smart contract inside hardhat/contracts directory. Check that everything works by running pnpm hardhat test and see all test cases pass.
If you have any issues, refer back to the hardhat directory, its package.json, and hardhat.config.ts.
Development
Let's configure
hardhat.config.tsso it can deploy smart contracts to a hardhat network, a locally running hardhat node, and a locally running cess node.Please use the following hardhat config in
hardhat.config.tsA local hardhat node listen to http://localhost:8545, while a local CESS node listens to http://localhost:9944 port. With this config and
hardhat-deploycomponent, we can deploy smart contract to our locally running CESS node bypnpm hardhat deploy --network cess-local.Now, for the smart contract, we want to have the following methods:
claim(bytes32 hash): a method for the caller to claim ownership of a file with the specified hash.forfeit(bytes32 hash): a method for the caller to forfeit ownership of a file with the specified hash.ownedFiles(): retrieving all the file hashes owned by the user.hasClaimed(hash): check whether a file hash has been claimed yet.
We can now deploy the smart contract in our local CESS node, following the tutorial of Deploying a Smart Contract in CESS.
Run a CESS node locally.
Having the four accounts and their addresses ready. For details, refer to Substrate EVM Address Conversion.
A CESS signing account, we will be using
/Alice:cXjmuHdBk4J3Zyt2oGodwGegNFaTFPcfC48PZ9NMmcUFzF6cc. This account also has some TCESS tokens initialized in a local CESS node.The EVM-mapped account of the above CESS signing account, which is
0xd43593c715fdd31c61141abd04a99fd6822c8558An EVM signing account, we will import the Alice private key
0xe5be9a5092b81bca64be81d212e7f2f9eba183bb7a90954f7b76361f6edb5c0ainto Metamask, and this yields an address of0x8097c3C354652CB1EEed3E5B65fBa2576470678A.The Substrate-mapped address of the above EVM signing account (#3), which is
cXgEvnbJfHsaN8HfoiEWfAi4QBENYbLKitRfG1CDYZpKTRRuw.
We first transfer some test tokens (say 1M tokens) from account #1 (Substrate account) to account #3 (EVM account) in Polkadot.js Apps.
With tokens in #3 wallet, we can deploy the Solidity smart contract on the local CESS node. We run the following hardhat command. Here, please modify the
hardhat.config.tsaccordingly about the account that you use for deployment.Take note of the deployed address for ProofOfExistence smart contract.
Next, we can connect to the smart contract using Remix and interact with the smart contract.
Front End
Prerequisites
Install Git
Install Node v18
Install pnpm
Run a local development chain of the CESS node because the front end will connect to the local CESS chain. Refer here on how to run a local CESS chain.
The complete front-end source code can be seen here.
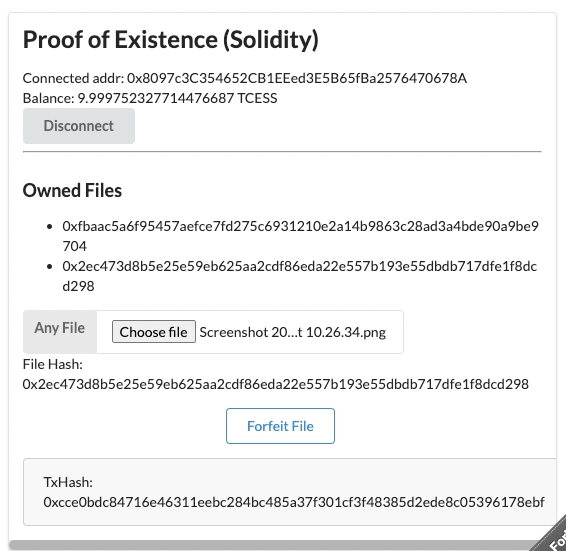
If you run it, you will see the Proof of Existence (Solidity) widget in the bottom right corner:
Development
The major development of the frontend is at frontend/src/ProofOfExistenceSolidity.js, as shown here.
We won't go over the front-end code line by line, but there are a few features I will point out here.
We are using wagmi library for the React Hooks to work with Ethereum smart contracts.
To use wagmi, we define our CESS local chain at here:
Then, we build up the chain's public clients and pass the clients in
createConfig(). Finally, theconfigobject is passed into the WagmiConfig React component.To connect to our Ethereum wallet, we use
useConnect()hook, which is being called in the ConnectWallet component.We get the information of the currently selected account and its balance by
useAccount()anduseBalance()hooks. These hooks are being used in the PoESolidity component.We read the contract data using
useContractRead(). One point to note here is we need to specify theaccountargument so themsg.sendervalue is set on the smart contract side.For writing to the contract, we follow the practice outlined in wagmi docs. We:
use
useDebounce()to ensure the smart contract is not being called too often.use
usePrepareContractWrite()to prepare for the contract write action.use
useContractWrite()to get thewrite()function to be passed in our TxButton component click handler.use
useWaitForTransaction()to get the transaction information and its status.
Tutorial Completion
Congratulation! Let's recap what we have done in this tutorial:
We have successfully implemented a PoE logic in the Solidity smart contract and deployed it on a local CESS node.
Starting with the Substrate Front End Template and adding wagmi React hook library, we have successfully implemented the front end that interacts with the smart contract.
Now, you can build your dApps and deploy them on the CESS testnet to test it out. If you haven't done so, try also to develop a dApp with Ink! smart contract as well.
References
Last updated