Build a Proof of Existence dApp (ink!)

Objective

In this tutorial, we will walk through a full dApp development experience and write out both the ink! smart contract and the React front end. We will also deploy the smart contract on a CESS local node and have the front end interact with it.

The application that we will develop is a Proof of Existence (PoE) dApp. It is used to prove that 1) one is the owner of a particular file, and 2) the file has the same content as it is at the point it was published on-chain. To understand the use case of the second point, think about a user who want to prove the content of a business contract, written in the form of a smart contract, has not been tampered with from the point it was published.

Instead of posting the whole file content on-chain, we will extract the first 64kB of the content, pass it to a hash function, and claim ownership of the file. Users can also send transactions on-chain to retrieve a list of their owned files and check if a file has been claimed. Note that this hashing mechanism is not secure for production use and serves only as demonstration purpose here.

The complete source code of this tutorial can be seen at the github repository.

We will first code the ink! smart contract side and then go back to the front-end side. Let's jump right in!

ink! Smart Contract

Prerequisites

This section has the same prerequisites as the tutorial Deploy an ink! Smart Contract. Please follow that section and install all required components: Rust and cargo-contract.

Development

  1. Let's start by building the directory structure

    mkdir poe-ink
    cd poe-ink
    cargo contract new contract

    The last command will create an ink! contract project skeleton.

    Inside the directory, there are three files.

    poe-ink/contract/
      ∟ .gitignore    # contains files to ignore when committing to git
      ∟ Cargo.toml    # This is a Rust project, so there is a `Cargo.toml` file for the project specification.
      ∟ lib.rs        # The actual smart contract and unit test code.

    The most interesting file is the lib.rs. It is a simple contract that reads and flips a boolean value. Please skim through it to get an idea of how ink! contract code is structured.

  2. Let's build and test the contract project.

    cd contract          # In case you haven't gotten inside the contract dir.
    cargo contract build # This command builds the contract project.
    cargo test           # This command runs the unit test code starting at the `mod tests` line in the code.

    Running the cargo contract build yields three files:

    • contract.wasm: the contract code

    • contract.json: the contract metadata

    • contract.contract: the contract code and metadata

    The front end (see next section) will need to read contract.json to know the API of the contract. We will use contract.contract to instantiate the contract on-chain.

  3. Open Cargo.toml and add dependencies as follows

      [dependencies]
      ink = { version = "5.0.0", default-features = false }
    
      scale = { package = "parity-scale-codec", version = "3", default-features = false, features = ["derive"] }
      scale-info = { version = "2.6", default-features = false, features = ["derive"], optional = true }
      
      ...
    
      std = [
        "ink/std",
        "scale/std",
        "scale-info/std",
      ]
    
  4. Open lib.rs. Let's remove everything and only keep the top-level structure. So we have:

    #![cfg_attr(not(feature = "std"), no_std, no_main)]
    
    #[ink::contract]
    mod contract {
      // We will fill up the code here next
    }
  5. In smart contract development, two of the keys are deciding how the storage data structure looks like and what events it emits. Let's think about the PoE functionality. We will need a storage from user addresses mapping to an array of files, indicating the hash digests of the files they owned; and a reverse map from the hash digest to its owner. Currently we don't support the same file / file digest to be owned by multiple users. The following storage structure supports this:

    mod contract {
      // The following two lines are added to import the support of vector `Vec` and `Mapping` data structure.
      use ink::prelude::{vec, vec::Vec};
      use ink::storage::Mapping;
    
      #[ink(storage)]
      pub struct Contract {
        /// Mapping from AccountId to hash digest of files the user owns
        users: Mapping<AccountId, Vec<Hash>>,
        /// Mapping from the file hash to its owner
        files: Mapping<Hash, AccountId>,
      }
    }

    We use #[ink(storage)] attribute macro to tell the Rust compiler this is the smart contract storage, and the compiler will further process the storage specification here. Check here to learn more about the macros ink! supports.

  6. Now, we want our smart contract to emit events when a user successfully claims the file ownership. Let's also allow the user to forfeit the claim in the future. So the two events are:

    mod contract {
      // ... below the storage data structure code
    
      #[ink(event)]
      pub struct Claimed {
        #[ink(topic)]
        owner: AccountId,
        #[ink(topic)]
        file: Hash,
      }
    
      #[ink(event)]
      pub struct Forfeited {
        #[ink(topic)]
        owner: AccountId,
        #[ink(topic)]
        file: Hash,
      }
    }

    We specify two events here:

    • Claimed: when this event is emitted, it contains the associated user and the file digest.

    • Forfeit: same as above, containing the associated user and the file digest.

  7. Let's work on the core logic of the smart contract

    mod contract {
      // ... below the event code
    
      impl Default for Contract {
          fn default() -> Self {
              Self::new()
          }
      }
    
      impl Contract {
        /// Constructor to initialize the contract
        #[ink(constructor)]
        pub fn new() -> Self {
          let users = Mapping::default();
          let files = Mapping::default();
          Self { users, files }
        }
    
        #[ink(message)]
        pub fn owned_files(&self) -> Vec<Hash> {
          let from = self.env().caller();
          self.users.get(from).unwrap_or_default()
        }
    
        #[ink(message)]
        pub fn has_claimed(&self, file: Hash) -> bool {
          self.files.get(file).is_some()
        }
      }
    }

    Here, we have defined three methods:

    • fn new(): the smart contract constructor. This function will be called when the smart contract is instantiated. It is marked with #[ink(constructor)] attribute macro right above the function.

    • fn owned_files(&self): This function returns a vector, the Rust way of saying an array, of hash digests. It first retrieves the caller of the smart contract, uses it as the key to retrieve its value inside the users storage map, and returns the value. If no value is found, an empty vector is returned.

      Notice this function doesn't take an AccountId parameter in, so callers can only check their own file ownerships.

    • fn has_claimed(&self, file: Hash): The function returns a boolean, indicating if the file specified by the hash has been claimed by another user. We read from the smart contract storage files, using the file hash as the key, and see if an owner can be retrieved. If yes, the file is claimed, and the function returns true. Otherwise, it returns false.

      Notice we still need to specify what hash function to use and how a file is converted to its hash digest. It is a job performed on the front end, so we will take care of this in the next section.

  8. Now let's work on the core logic of fn claim(). It allows a user claims the ownership of a particular file digest. The overall logic is that:

    • We first check if the file digest has been claimed.

    • We update the storage files and users to indicate the caller claims the file ownership.

    • Emit an event that the file has been claimed so other listeners know about this.

    The following code entails the above logic:

    mod contract {
      // ...previous code
      impl Contract {
        // ...previous code
    
        /// A message to claim the ownership of the file hash
        #[ink(message)]
        pub fn claim(&mut self, file: Hash) -> Result<()> {
          // Get the caller
          let from = self.env().caller();
    
          // Check the hash has yet to be claimed
          if self.files.contains(file) {
            return Err(Error::AlreadyClaimed);
          }
    
          // Claim the file hash ownership with two write ops
          // Update the `users` storage. If a vector is retrieved, we push the hash digest into
          //   the vector. Otherwise, we create a new vector with the hash digest element inside.
          match self.users.get(from) {
            Some(mut files) => {
              // A user entry has already been built
              files.push(file);
              self.users.insert(from, &files);
            }
            None => {
              // A user entry hasn't been built, so building one here
              self.users.insert(from, &vec![file]);
            }
          }
    
          // Update the `files` storage
          self.files.insert(file, &from);
    
          // Emit an event
          Self::env().emit_event(Claimed { owner: from, file });
    
          Ok(())
        }
      }
    }
  9. You may have noticed the return value type of fn claim() looks different from the two previous functions fn owned_files() and fn has_claimed(). fn owned_files() and fn has_claimed() are view functions. They only read the contract storage but don't alter it. fn claim(), on the other hand, is a state-modifying function. It returns a Result enum type in Rust to indicate whether the function successfully changes the state by returning Ok(()), or an error occurs and the state change is reverted by returning Err(error value here).

    Now, let's define the error values. Two error values will be emitted in the contract: when users try to claim a file that has already been claimed, AlreadyClaimed, and when users try to forfeit the file ownership they don't own, NotOwner.

    mod contract {
      // ... prev code
    
      // Beware that this part of the code is OUTSIDE of `impl Contract {}`, unlike the claim() function above.
    
      // Result type used in `fn claim()` is a short form.
      pub type Result<T> = core::result::Result<T, Error>;
    
      // These are two error values returned in our contract
      #[derive(Debug, PartialEq, Eq, scale::Encode, scale::Decode)]
      #[cfg_attr(feature = "std", derive(scale_info::TypeInfo))]
      pub enum Error {
        /// File with the specified hash has been claimed by another user
        AlreadyClaimed,
        /// Caller doesn't own the file with the specified hash
        NotOwner,
      }
    
      impl Contract {
        // ... prev code
      }
    }
  10. The fn forfeit() function basically reverses the operation of what fn claim() does above.

    • we first check the caller owns the file. If not, we return an error.

    • we update the users and files storage to remove the file hash digest.

    • emit an event about this new state.

    mod contract {
      // ...previous code
      impl Contract {
        // ...previous code
        #[ink(message)]
        pub fn forfeit(&mut self, file: Hash) -> Result<()> {
          let from = self.env().caller();
    
          // Check if the caller owns the file. If not, return `Error::NotOwner`.
          match self.files.get(file) {
            Some(owner) => {
              if owner != from {
                return Err(Error::NotOwner);
              }
            }
            None => {
              return Err(Error::NotOwner);
            }
          }
    
          // Confirmed the caller is the file owner. Update the two storage `users` and `files`.
          let mut files = self.users.get(from).unwrap_or_default();
          for idx in 0..files.len() {
            if files[idx] == file {
              files.swap_remove(idx);
              self.users.insert(from, &files);
            }
          }
    
          self.files.remove(file);
    
          // Emit an event
          Self::env().emit_event(Forfeited { owner: from, file });
    
          Ok(())
        }
      }
    }
  11. By this point, you have completed all the core logic of the smart contract. Compile the contract with
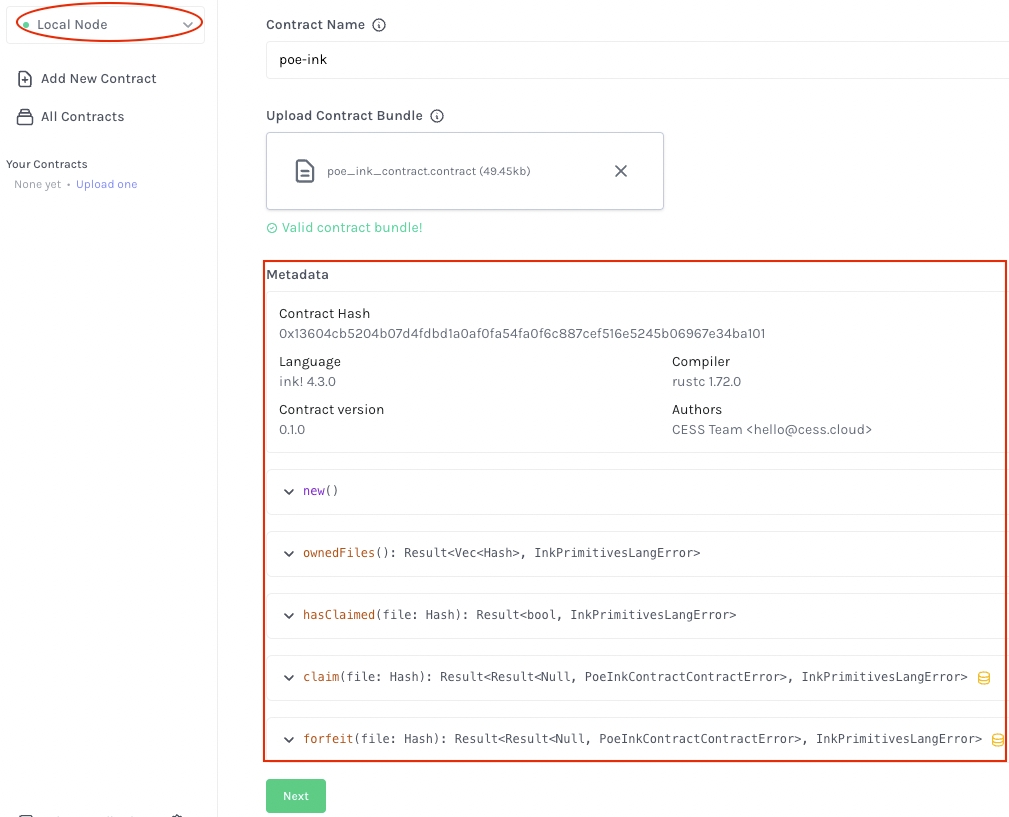
 cargo contract build to ensure it builds. If there is any doubt about the final source code, you can always refer to the source code here.

  12. After the compilation, deploy the contract on your local cess dev chain and interact with the contract to test it. You can access Contracts UI, connect it to your local node, and deploy the contract. Refer to the screenshot below.

    Ensure that:

    • Contracts UI is connecting to the local CESS node.

    • You see the expected metadata when uploading the contract.contract file.

Congratulation! You have completed the smart contract development section. Before heading to the front-end development, the complete source code also contains the unit test code, the code block inside mod tests { ... }. We won't go over them here as they are quite self-explanatory. Please take a look. You can run them by cargo test command. Check here to learn more about contract testing.

Front End

Prerequisites

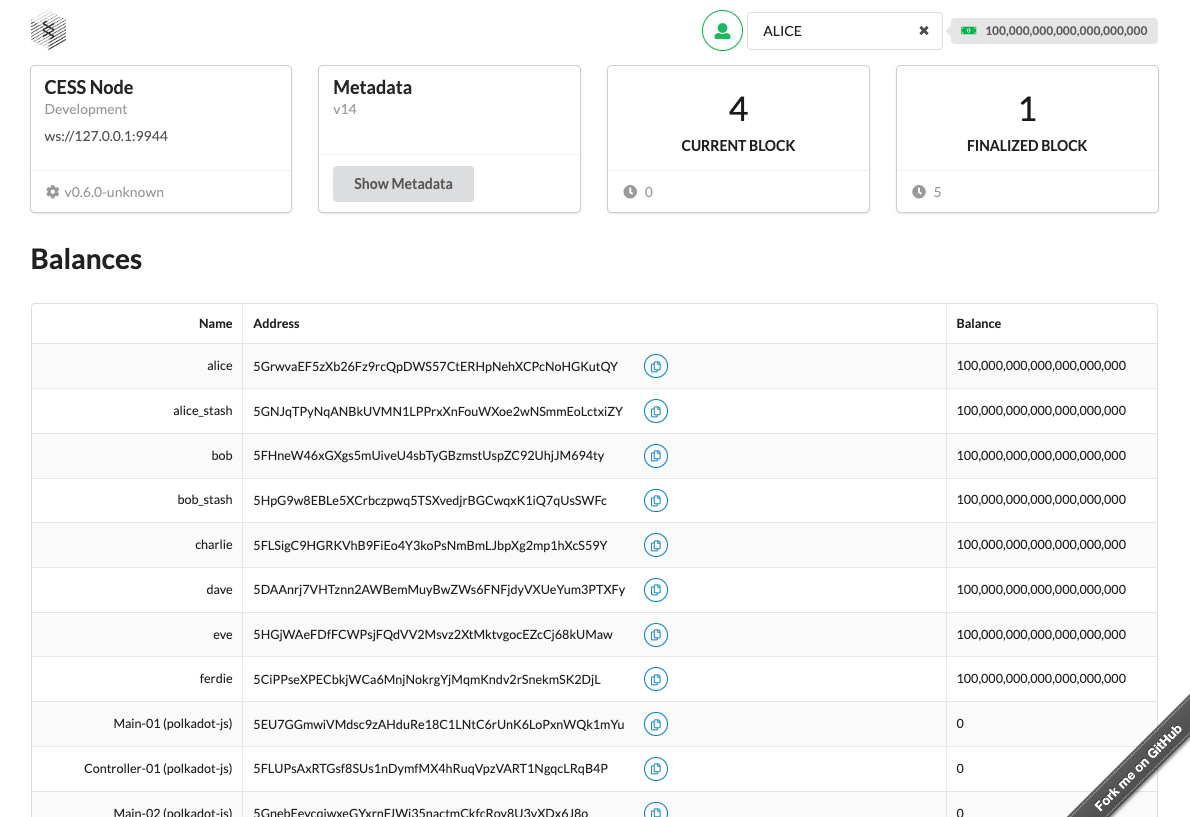
We will start from a forked version of the Parity maintained Substrate Front End Template.

cd poe-ink    # This is the root directory created during the smart contract development above.
git clone https://github.com/CESSProject/substrate-frontend-template.git frontend
cd frontend
pnpm install  # pull all the project dependencies down

# Before starting the front end below, open another terminal window and start your local CESS node.
# Refer to ./deploy-sc-ink.md#deploy-a-smart-contract

pnpm start    # start the project

If you see a screen similar to the following, you are good to go.

Before We Start

First of all, in case there is any doubt, you can always refer back to the entire front end source code.

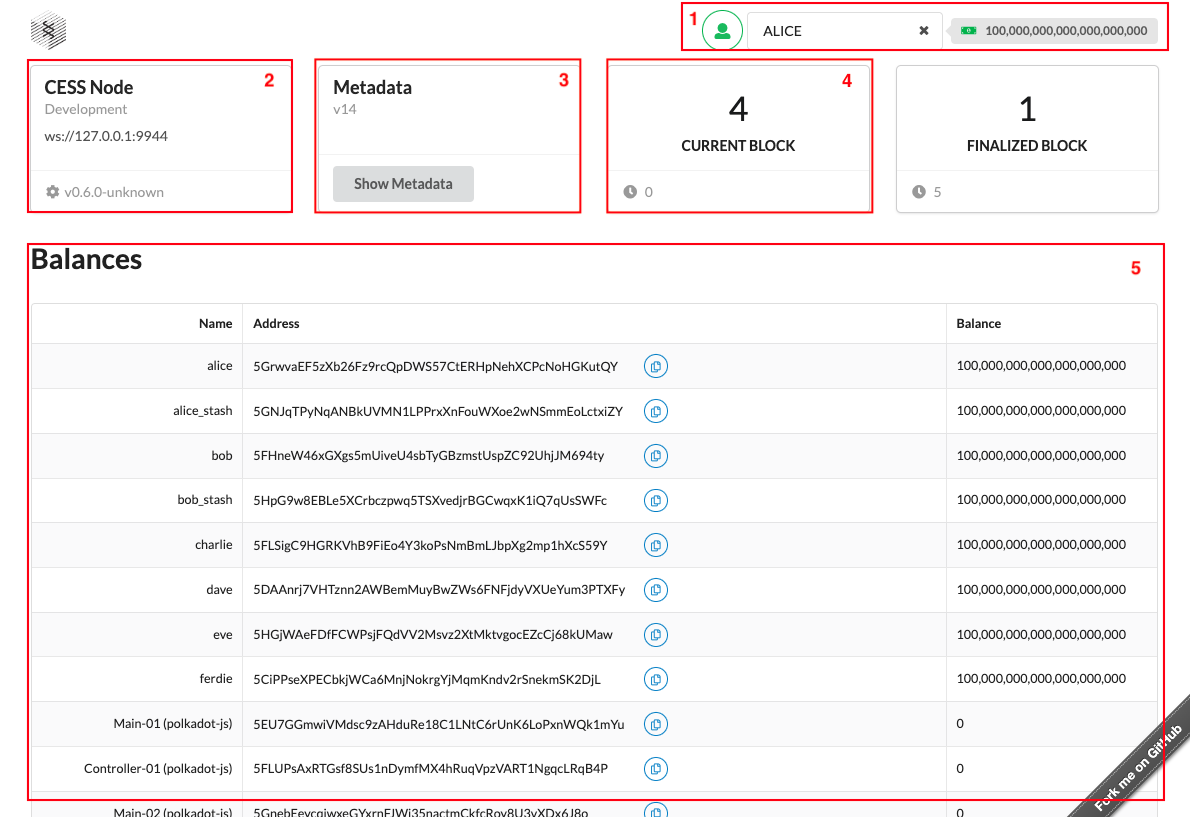
To get a high-level understand of the front end template, let's refer to the second half section of src/App.js:

function Main() {
  // ...code snapped
  return (
    <div ref={contextRef}>
      <Sticky context={contextRef}>
        <AccountSelector />
      </Sticky>
      <Container>
        <Grid stackable columns="equal">
          <Grid.Row stretched>
            <NodeInfo />
            <Metadata />
            <BlockNumber />
            <BlockNumber finalized />
          </Grid.Row>
          <Grid.Row stretched>
            <Grid.Column>
              <Balances />
            </Grid.Column>
          </Grid.Row>
          <Grid.Row stretched>
            <Grid.Column width={8}>
              <Transfer />
            </Grid.Column>
            <Grid.Column width={8}>
              <Upgrade />
            </Grid.Column>
          </Grid.Row>
          <Grid.Row stretched>
            <Grid.Column width={8}>
              <Interactor />
            </Grid.Column>
            <Grid.Column width={8}>
              <Events />
            </Grid.Column>
          </Grid.Row>
          <Grid.Row stretched>
            <Grid.Column width={8}>
              <PoEWithInk />
            </Grid.Column>
            <Grid.Column width={8}>
              <PoEWithSolidity />
            </Grid.Column>
          </Grid.Row>
        </Grid>
      </Container>
      <DeveloperConsole />
    </div>
  );
}

Let's see how different components are laid out on the screen.

  1. The <AccountSelector/> component, referring to src/AccountSelector.js.

  2. The <NodeInfo /> component, referring to src/NodeInfo.js.

  3. The <Metadata /> component, referring to src/Metadata.js.

  4. The <Balances /> component, referring to src/Balances.js.

We will add a new component and showcase how to use use-inkathon javascript library connecting the front end to the smart contract.

Development

  1. Add the use-inkathon dependency by:

    pnpm add @scio-labs/use-inkathon
  2. In src/App.js, let's replace the <TemplateModule /> component with <PoEWithInk />. Remove the TemplateModule import line and add PoEWithInk. We also create a basic React skeleton of src/ProofOfExistenceInk.js.

    So, src/App.js becomes:

    // Remove/comment out this line
    // import TemplateModule from "./TemplateModule";
    // Add the following line
    import PoEWithInk from "./ProofOfExistenceInk";
    
    //... code snapped
    return (
      <div ref={contextRef}>
        { /* code snapped */ }
        <Container>
          <Grid stackable columns="equal">
            {/* code snapped */}
            <Grid.Row>
              <PoEWithInk />
            </Grid.Row>
          </Grid>
        </Container>
        {/* code snapped */}
      </div>
    )

    Open the file src/ProofOfExistenceInk.js and add the following code:-

    import { React, useState } from "react";
    
    export default function PoEWithInkProvider(props) {
      return (<>Proof of Existence Ink! dApp</>);
    }

    At this point, the front end should show the line "Proof of Existence Ink! dApp".

  3. From now on, we will mainly focus on the file src/ProofOfExistenceInk.js. We will not be adding code line by line here, but focus on the APIs provided by use-inkathon library that facilitate ink! smart contract interaction.

    Refer to the code src/ProofOfExistenceInk.js.

  4. Starting from the bottom, we have:

    <UseInkathonProvider
      appName="Proof of Existence (Ink)"
      defaultChain={cessTestnet}
      deployments={getDeployments()}
    >
      <ProofOfExistenceInk/>
    </UseInkathonProvider>

    UseInkathonProvider context hook provides ink! contract connection information to its children components. A config object is passed in with the name, and:

    • defaultChain: there are public chains with well-known IDs. As we connect to a local development chain, we set it to cess-local.

      export const cessTestnet = {
        network: 'cess-local',
        name: 'CESS Local',
        ss58Prefix: 11330,
        rpcUrls: [
          'http://127.0.0.1:9944',
        ],
        testnet: true,
        faucetUrls: ['https://cess.cloud/faucet.html'],
        explorerUrls: {
          [SubstrateExplorer.Other]: `https://substats.cess.cloud/`,
        },
      }
    • deployments: takes an object with contract information, such as contractId, networkId, abi and contract address.

      const getDeployments = () => {
        let developments = [
          {
            contractId: 'poe-ink-contract',
            networkId: cessTestnet.network,
            abi: metadata,
            address: CONTRACT_ADDR,
          },
        ];
        return developments;
      }

    With UseInkathonProvider, we can make ink! API calls inside <ProofOfExistenceInk /> component.

  5. Looking at the code inside function ProofOfExistenceInk(props) {...}

    // NOTE: In `examples/poe-ink/contract` directory, compile your contract with
    //   `cargo contract build`.
    import metadata from "../../ink/poe/target/ink/poe_ink_contract.json";
    
    // NOTE: Update your deployed contract address below.
    const CONTRACT_ADDR = "cXjN2RG7YEpxx1bCa4zJKy3igsh3DuEo8bHnfKp1KsH5LaUub";
    
    
    const ProofOfExistenceInk = () => {
      // get RPC api and active account
      const { api, activeAccount } = useInkathon();
      const { freeBalanceFormatted } = useBalance(activeAccount?.address);
    
      const developments = getDeployments();
    
      // Register the contract and get contract object
      const { contract: poeContract } = useRegisteredContract(developments[0].contractId);
      const [fileHash, setFileHash] = useState(null);
      const [ownedFilesRes, setOwnedFilesRes] = useState([]);
    
      //... code snapped
    }
    • Use useInkathon() to get the current active account and rpc api.

    • Use useBalance(account) to get the account's current balance.

    • Use useRegisteredContract(contractId) to get the contract ABI.

At this point, we have a contract instance poeContract that we can interact with.

- We then use `contractQuery()` to query the value returning from `ownedFiles()` function from the smart contract. Recall from the previous section that this function returns all the file hash digests the user account owned.

- Then we use `decodeOutput()` method to decode the result, converting from the chain data types to javascript data types.

All the functions mentioned here are provided by **use-inkathon**. You can learn more about their usage in [**use-inkathon documentation**](https://www.npmjs.com/package/@scio-labs/use-inkathon?activeTab=readme).

6. Here, we specify how the file hash digest is computed.

```jsx
const computeFileHash = (file) => {
  const fileReader = new FileReader();
  fileReader.onloadend = (e) => {
    // We extract only the first 64kB  of the file content
    const typedArr = new Uint8Array(fileReader.result.slice(0, 65536));
    setFileHash(blake2AsHex(typedArr));
  };
  fileReader.readAsArrayBuffer(file);
};
```

We use [`FileReader`](https://developer.mozilla.org/en-US/docs/Web/API/FileReader) provided in modern-day browser JS APIs to read the uploaded file, extract the first 64 kB, and use `blake2AsHex()` [Blake2 cryptographic hash function](https://en.wikipedia.org/wiki/BLAKE_(hash_function)#BLAKE2) to calculate its hash digest provided by [**@polkadot/util-crypto**](https://polkadot.js.org/docs/util-crypto/examples/hash-data) library.

7. We then implement a few helper components TxButton, ConnectWallet, and WalletSwitcher to display the UI.

- **TxButton** component sends either `claim()` or `forfeit()` transaction to the chain depending on whether the user owned the file. It uses `contractTx()` to construct and send the transaction.

- **ConnectWallet** component allows users to switch from different wallet providers, including Enkrypt, Polkadot.js extension, SubWallet, and Talisman. A typical choice would be to use [Polkadot.js extension](https://polkadot.js.org/extension/).<br/>

    ![Our Front end supports multiple wallet providers](../../assets/developer/tutorials/poe-ink/wallet-type.png)

    It uses `connect()` function from `useInkathon()` and `allSubstrateWallets()` to get the information of all supported wallets.

- **WalletSwitcher** component retrieves all available accounts provided by the wallet chosen in **ConnectWallet**, using the `accounts` object. It also uses `setActiveAccount()` to set a particular account and `disconnect()` to disconnect from the chosen wallet.

8. Finally, we have a front end similar to the following:

![Proof of Existence Front end](../../assets/developer/tutorials/poe-ink/full-frontend.png)

Tutorial Completion

Congratulation! Let's recap what we have done in this tutorial:

  • We have successfully implemented a PoE logic in ink! smart contract and deploy it on a local CESS node.

  • Starting with the Substrate Front End Template and use-inkathon React library, we have successfully implemented the front end that interacts with the smart contract.

Now, you can build your dApps and deploy them on the CESS testnet to test it out. For the next step, you can also learn how to develop a dApp with Solidity smart contract as well.

References

Last updated