
Build a NFT Marketplace (ink!)
In this tutorial, you will learn the basic idea of how you can build an NTF marketplace on CESS using Ink! You will write a smart contract that will mint NFT tokens for the files that are uploaded to the CESS network. After minting the tokens users will also be able to list and delist their NFT tokens from sale. So, before we get started, let's understand NTF and CESS. If you already know about NFT and CESS, you can skip to NFT Marketplace Architecture. section.
Warning! tl;dr
NOTE: This is going to be a long tutorial. However, it's worth giving time if you really want to understand how to create your own NFT Marketplace.
What is NFT?
Before we can understand what NFT (Non-Fungible Token) is, we need to understand fungible tokens. Fungible tokens are interchangeable, like Dollar or Bitcoin. Their value stays the same everywhere. For example, on physical currency bills, you can exchange a $10 bill for another $10 bill and the worth remains the same. That is, they are interchangeable because both values are the same.
On the other hand, Non-Fungible Tokens are not interchangeable. For example, land properties are non-fungible because two pieces of land are very unlikely to be of the same value. They may have different natural resources and many different factors that can make the land of different value.
In blockchain, Fungible tokens are called ERC-20 tokens, a standard format created by the Ethereum Foundation. Some examples of ERC-20 tokens are Bitcoin (BTC), Tether (USDT), etc. Where Non-Fungible tokens are created using the ERC-721 token standard, which recognizes token ownership. Similar to this there is the PSP34 standard that is written in ink!. This standard is used to store ownership of the tokens/collectibles in the blockchain. These collectibles can be anything like a deed of ownership, land, piece of art, video, images, etc.
What is CESS?
CESS or Cumulus Encrypted Storage is a fully decentralized data storage protocol that provides a full-stack solution for all your data storage needs. It is the first decentralized storage protocol that provides users with data ownership rights, that is fast, scalable, efficient in storage space utilization, and guarantees data availability.
CESS provides SDKs and RESTful APIs to upload and download files through the gateway to the CESS network without worrying about understanding the underlying mechanics of the file distribution mechanism of CESS. You can learn more about CESS here.
NFT Marketplace Architecture
The above image depicts the overall flow and communication of all the components involved in creating a marketplace. The user application consists of a wallet and a marketplace where users can buy and sell their assets as NFTs. You will also need a smart contract that will implement the PSP34 standard for token ownership, buying, and selling NFTs. Since this tutorial mainly focuses on the basic idea of how we can create an NFT marketplace on CESS, we will not be implementing managing reward points and the Admin application. However, to give an idea of what a complete NFT application looks like, please read the following.
The frontend application can be divided into two parts, user application and admin application. The Admin application will have the right to deposit or withdraw tokens from the smart contract that will be consumed when a user redeems his reward points. We call it a Treasury. They also have the ability to manage reward points. On the other hand, Users will start by obtaining CESS tokens from the User Application. After receiving some tokens, they can proceed with purchasing space or claiming space obtained by the referral program. Once they have some space available for their account, they can then upload assets (image, video, audio, etc.) on the CESS network. To create an NFT, users will first need to upload their NFT asset to CESS and send a transaction with the metadata of ownership of the NFT to the CESS blockchain. After the transaction is confirmed, they can now list their NFT for sale/lease or gift to any other user.
Users can access the marketplace from their application to view all the listed NFTs available for purchase or lease. To purchase an NFT they will be required to have enough tokens in their wallet account. For each purchase, depending on the application configuration, users can be rewarded with a certain amount of reward points. Which they can redeem in their next purchase. Whenever a user redeems their reward points, the sum of the remaining amount to the seller is given from the treasury. Once the ownership is transferred to another user, the associated file is also moved to the new owner's storage space.
NOTE: Since this tutorial is more focused on the basic functionality of an NFT Marketplace, to keep it simple we won't be implementing all the features that are mentioned above.
How to Create an NFT?
Creating NFTs entails selecting the assets we want to own. For example, a piece of art as an image can be minted as NFT.
We will use CESS to store our assets. Assets can be anything like video, image, audio, etc. And generate JSON metadata of our asset that we will write on CESS Blockchain.
Note here, that we will not store our asset data itself in the blockchain, but rather only the metadata. This is because storing the files themselves on the blockchain will make the blockchain bloated, making all the nodes download our asset, which will not only cost us more but unnecessarily replicate our asset with all the nodes.
NFTs are assigned a unique ID which we will increment as we mint new NFTs. We will use the last_token_id to track the last minted token ID.
When we upload a file to the CESS network we receive a File ID (fid). Since this fid is unique to the CESS network, we can use it as the TokenID for our contract. However, openbrush library throws a Decoding error if we use the fid as the TokenID. Therefore, we use a map fid_list instead that maps our TokenID to the fid. Similarly, we also have a map that holds all the NFTs that are listed for sale on sale_list. The collection_id is just an ID for our NFT collection. max_supply is the maximum number of NFT tokens that we can mint in our smart contract. Lastly, price_per_mint is the price for minting each NFT token. The amount collected from price_per_mint is collected in the smart contract that can be withdrawn by the owner of the contract.
Adding Wallet to your Application
Our application will require a wallet that will help us sign storage and NFT-related transactions and broadcast on the CESS network. Since CESS is built on top of the Substrate framework, CESS supports polkadot.js wallet. Depending on the frontend stack you choose, Polkadot provides support for multiple platforms, such as:
For web apps, please follow Polkadot.js Extension
For Android applications, please follow Nova Substrate SDK for Android
For iOS applications, please follow Nova Substrate SDK for iOS
Once the wallet is integrated with the application, make sure to configure it to the CESS test network.
Uploading assets to CESS
CESS provides us with various SDKs and RESTful APIs to upload our files. We will be using CESS testnet to create our marketplace. The steps will be similar for the mainnet however. We will upload the CryptoPunk image as our asset to CESS. But before we can upload a file to CESS, we need to fulfill some prerequisites. Like funding an account and purchasing space.
Funding your Account
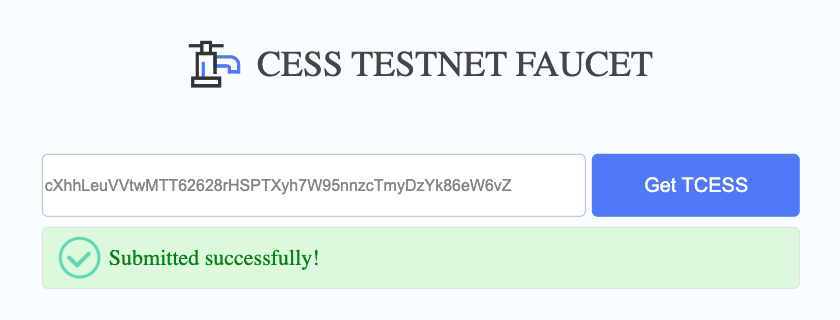
Funding your account is fairly easy. Visit CESS Testnet Faucet and enter your account address then press Get TCESS. Your account will be funded with 10,000 CESS Tokens.
Purchasing Space
There are two options for purchasing space.
Using SDK, or
A. Purchase space using SDK
Depending on the SDK you choose for your application, the steps below will be somewhat similar. We will be using Javascript SDK for this guide.
Install Javascript SDK
Import SDK
Initialize API
Rent Space
B. Purchase space using CESS Explorer
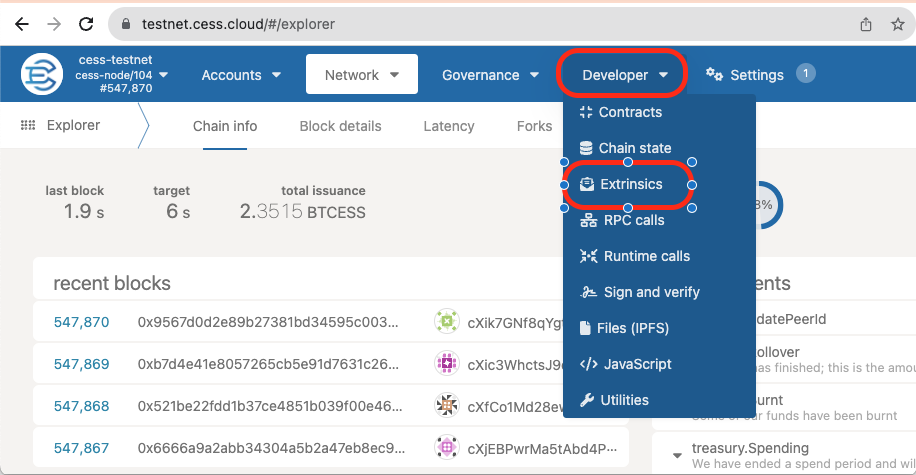
To purchase space, first, navigate to CESS Explorer and follow the instructions.
Navigate to Developer > Extrinsics
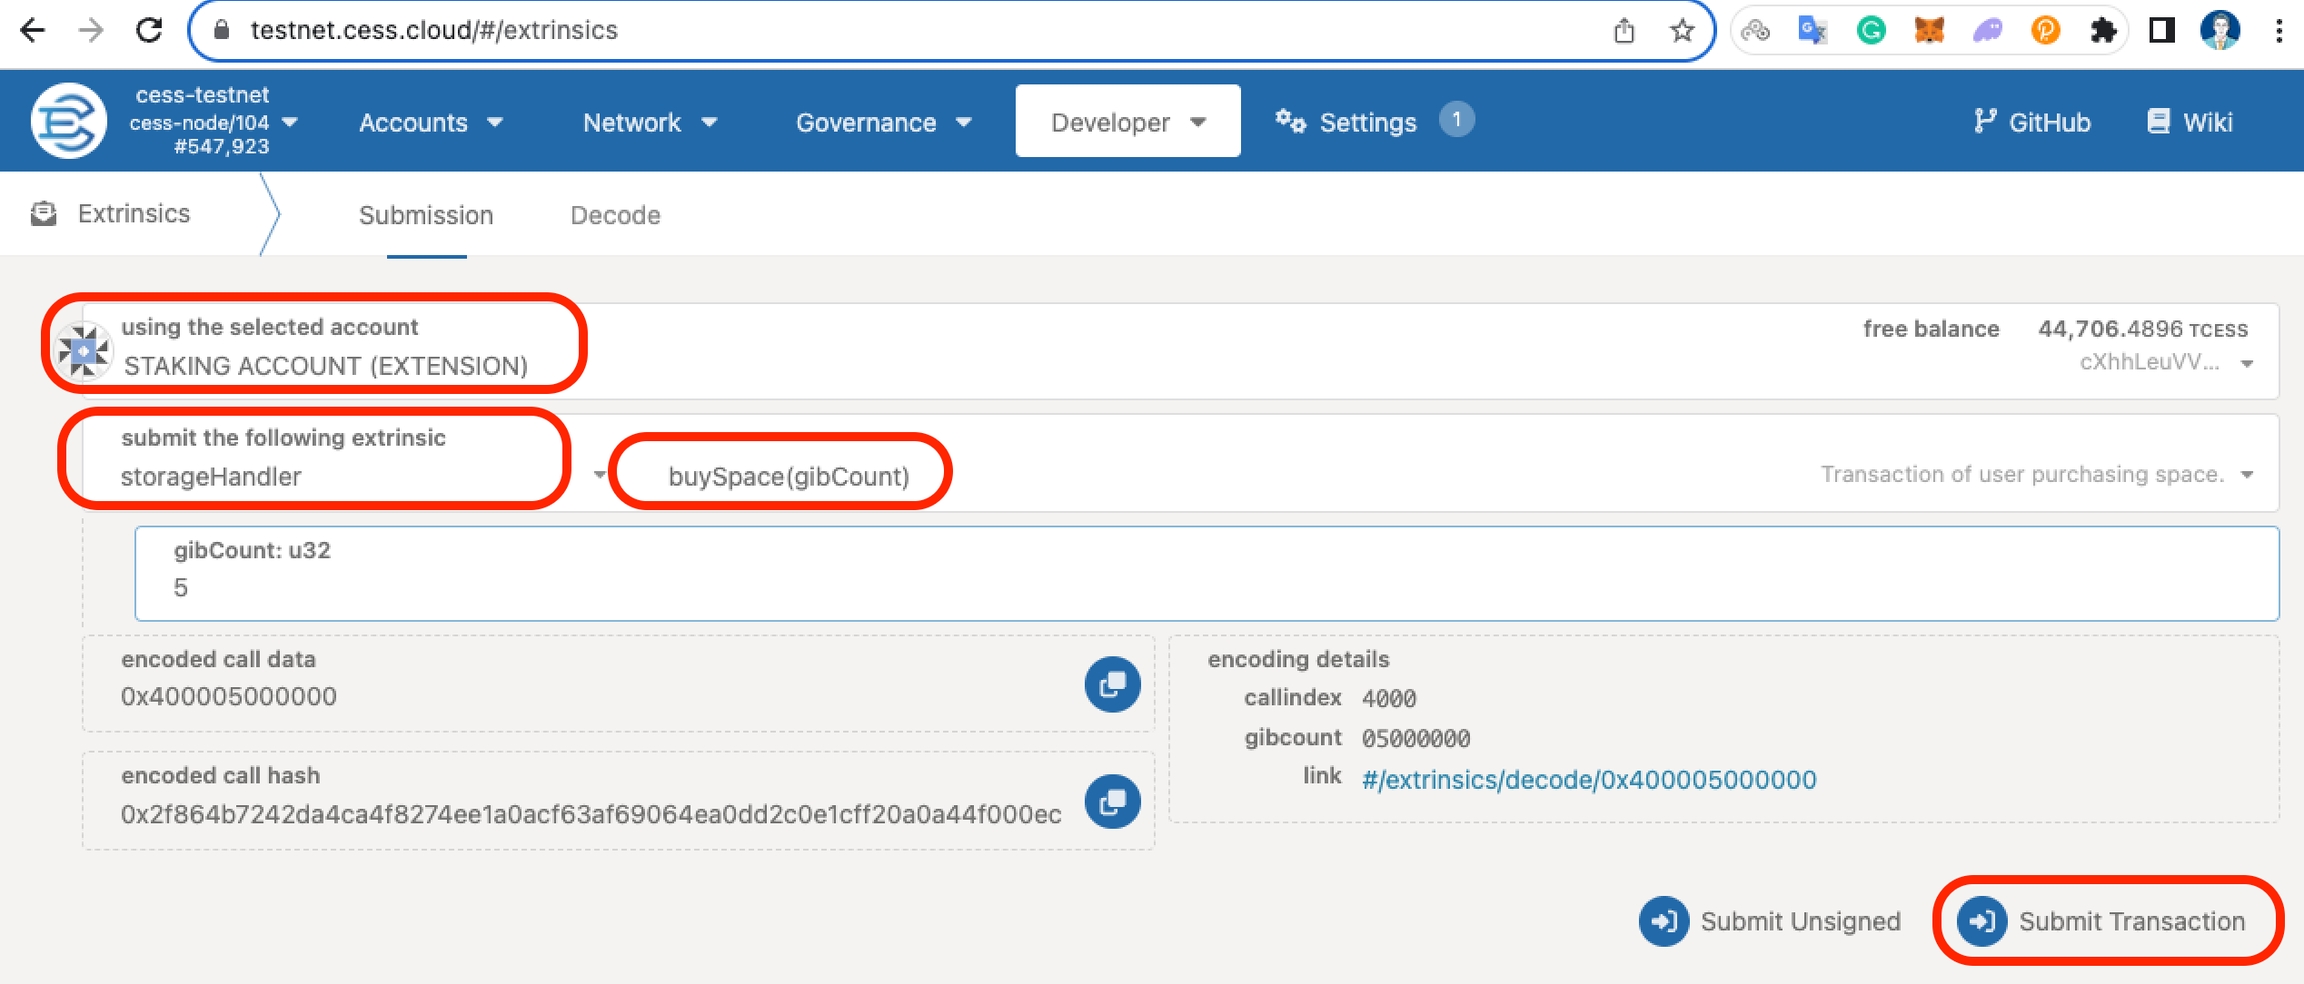
Select the appropriate account. Then select
storageHandlerunder "submit the following extrinsic", andbuySpace(gibCount)function. Enter the amount of storage space you would like to purchase and click Submit Transaction.
Upload file to CESS
Once we have tokens in our account and enough storage space allocated to our account, we are ready to upload our files to the CESS network. Since we will be using the CESS DeOSS gateway to upload our files, we will have to authenticate the DeOSS gateway so that the gateway can send some storage-related transactions on our behalf and generate an authorization token. For testnet DeOSS we have
DeOSS URL: http://deoss-pub-gateway.cess.cloud/
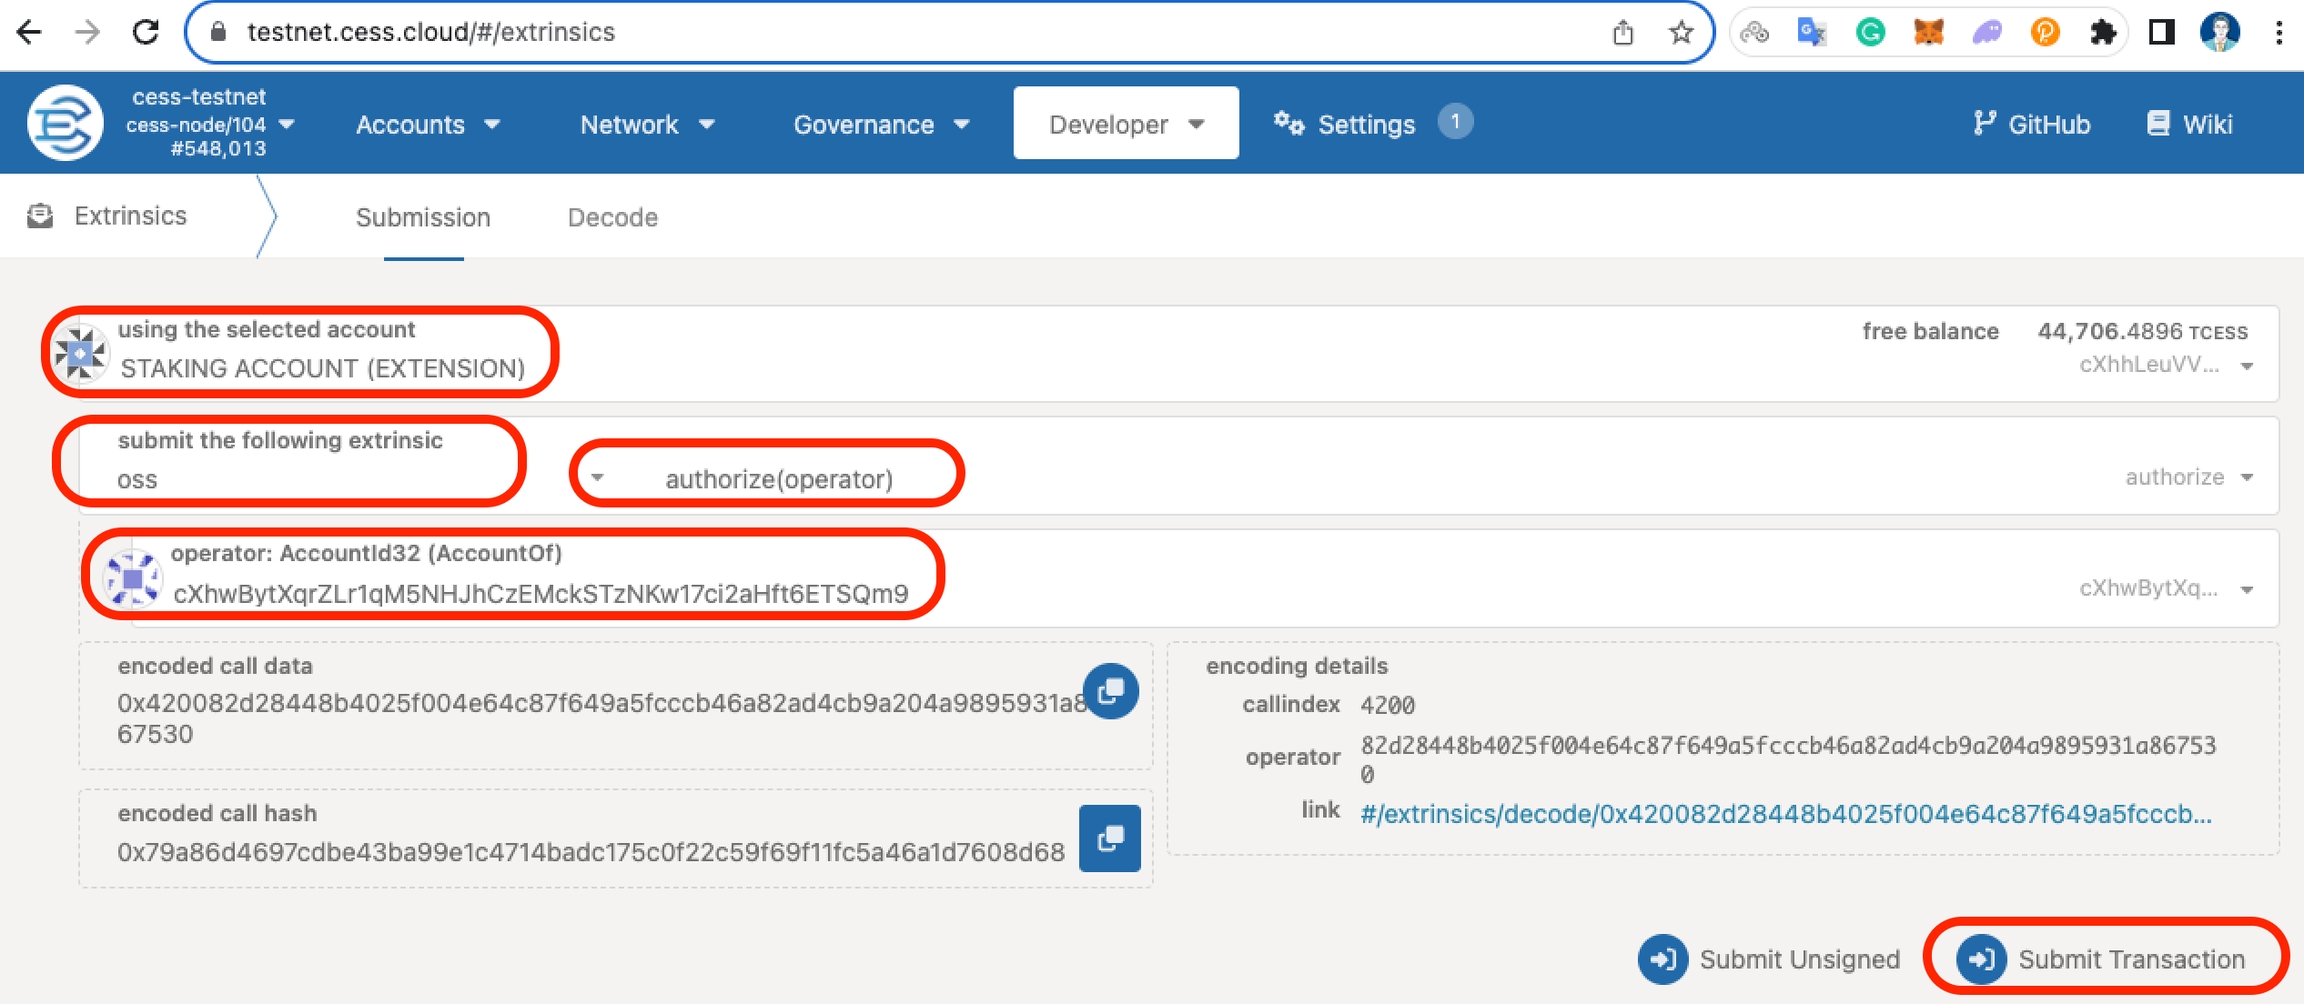
DeOSS Gateway Account Address: cXhwBytXqrZLr1qM5NHJhCzEMckSTzNKw17ci2aHft6ETSQm9
To authenticate the DeOSS from the testnet explorer extrinsic section execute
oss>authorize(operator)with the gateway account address given above.Generate authorization token: To generate an authorization token, please follow this Guide. It will take approximately 5 minutes.
Now we are ready to upload our files to CESS. We can either use REST API or SDK to upload our files.
A. Upload using SDK
Once again, we will use the Javascript SDK to upload our files. The initialization phase will be the same as the previous section. Once initialized, we can add the following code snippet.
B. Upload with REST API
Now, we can use REST API to upload our files to the CESS network.
To upload a file execute the following command
Here, -F is used to specify the file location and the type of file, -H to set your Authorization token and BucketName where this file will be stored.
Executing this function will return us with an FID that we can use to access our file.
Marketplace Smart Contract
We will use ink! to write our smart contract. As I mentioned above, our smart contract will be responsible for creating NFTs based on the PSP34 standard. Before we get started, there are some prerequisites. Please follow Deploy an Ink! Smart Contract tutorial and install Rust and cargo-contract.
Development
Let's start by creating a new contract
The last command will create an ink! contract project skeleton.
Inside the directory, there are three files.
Let's build and test the contract.
Running the
cargo contract buildyields three files:contract.wasm: the contract codecontract.json: the contract metadatacontract.contract: the contract code and metadata
The front end (see next section) will need to read
contract.jsonto know the API of the contract. We will usecontract.contractto instantiate the contract on-chain.We will use the openbrush library that implements the PSP34 token standard and many other useful features that make ink! development faster, safer, and easier. To add openbrush library to your project add the below dependency in your
Cargo.toml. Also, update yourinkdependency from4.2.0to~4.2.1.Now, add
openbrush/stdto the[features]:Open
lib.rsand remove everything except the top-level structure. You should have:Let's start with adding the required implementations from Openbrush. We will be using PSP34 token standard,
Ownablefor tokens that can be owned,PSP34Mintableto enable users to mint new tokens,PSP34Metadatato store our meta data on blockchain, andPSP34Enumerableto enumerate through our tokes. We will also need to changeink::contracttoopenbrush::contract.Ink! contract requires exactly one storage
structto store our data on blockchain, at least one constructor, and a message function. With that in mind, let's first add our storagestructwithin ournft_marketmodule.Each data type that we wish to store on blockchain needs to be specified with
#[storage_field]macro.psp34: stores PSP34 token standard related dataguard: is used to prevent reentrancy attacksownable: allows us to create ownable data that can also be transferred,metadata: to store custom attributenftdata: we will store our NFT related data here, like the maximum supply, price per mint etc.enumerable: to query the number of NFTs issued or to query NFT tokens.
Now we need to implement the NftMarket structure and add a constructor to it.
Since we have our constructor now, we can add our dependencies in the "We will add our dependencies here" section.
Note here, we haven't created impls module that we have added here as a dependency. Don't worry, we will be creating it soon.
To keep our smart contract flexible we will take some inputs from the user while deploying our smart contract, giving them the ability to set
name: The name of the smart contractsymbol: Token symbolbase_uri: Where we can access our NFT file andprice_per_mint: Amount of CESS Tokens users will have to pay to mint a token
With that said, let's define the constructor body that we wrote in step 7.
Events: To emit events when a certain event occurs in our smart contract, we can define it with
#[ink(event)]. We will addTransferandApprovalevents and override thepsp34::Internalevent.Now let's create our custom storage item
NftData. For that create a new directoryimplsand createmod.rs,types.rsandmarket.rs. Your directory structure should look like:Open your mod.rs file and add
Now, open
types.rsto create our customNftDatastructure.Here,
last_token_idholds the id of the latest minted token ID. This is so that every new token generated will incrementlast_token_idto give the tokens a unique ID.collection_idis a unique ID of our collection.max_supplyis the maximum number of NFTs that we can mint.price_per_mintis the price that users will have to pay to mint their NFTs.fid_listis a map of Token ID and the File ID that we mint as our NFT.sale_listcontains the list of NFTs that are listed for sale.
Any custom data structure that we create that needs to be stored on the blockchain needs to be marked with
#[openbrush::storage_item]macro. We will also add anenumthat will contain our error messages.Now comes the exciting part where we will write our actual contract functionality. You guessed it right! In our
market.rsfile. In ourmarket.rsfile, we will add our custom trait that inherits openbrush traits to add our methods to the contract.Let's add our first function to the
MarketImpl. Themintfunction! That will mint our NFT.Since users will have to pay tokens to mint an NFT, we will add
payablemacro to this function. Also, addingmessagemacro makes the function available to the API for calling the contract. More about themessagecan be found here.Don't worry about the check_fid and check_value functions here we will define them in the later section. The mint function accepts
fidas input from the users. Thisfidis the file ID that we will obtain when we upload a file to the CESS network. In ourmintfunction, we first extract thecallerby callingSelf::env()::caller(), then we generate a new tokenid, and mint the NFT token to the caller. We also store our file ID in thefid_listmap which maps our tokenidto thefid. And lastly, we increment thelast_token_id.If you would like to enable users to mint tokens for other users you can add the following function.
To enable contract owner to set or update
base_uriandmax_supplyadd the following functionNote: The
#[modifiers(only_owner)]macro as the name suggests, makes a function to be called only by the owner of the contract.Let's add some functions that users can call to get some information stored in our contract.
Finally lets add the functions that will allow users to list and sell our NFTs
The
listfunction lists our NFT for sale, whereasdelistremoves our NFT from sale. Once a user has listed his NFT for sale, the NFT becomes available for other users to purchase. They can call thepurchasefunction with the NFT id that they would like to purchase. Since purchase is a payable function, users will also have to transfer the desired amount of tokens in order for a successful transfer.Note: In the
market.rsfile you will notice some TODOs. To keep the tutorial simple, we haven't implemented those functions.Finally, the
withdrawfunction withdraws all the collected tokens while minting NFT to the contract owner's address.Now, let's create a custom trait that inherits
internaltrait for our NftData. The functions defined within the Internal trait will not be exposed to the users, hence called internal. We will add some functions for verification of owner, transfered funds etc.Lastly, let's add our trait implementation for our NftMarket. Open lib.rs and add the follwing code.
With this, our smart contract is now ready to be compiled and deployed. Please follow our Deploying smart contract with Ink! To deploy the smart contract and interact with it.
A full code of this tutorial can be found at:
https://github.com/CESSProject/cess-examples/tree/main/ink/nft_market
Conclusion
In this tutorial, we have learned what NFT is, and how we can use CESS to store our NFT file. We also learned how to use openbrush to implement PSP34 token standards and the way ink contracts are structured and fully implemented in an NFT marketplace with the most basic functionality that enables users to mint and sell their NFTs.
What's Next?
In the next session, we will learn to build a front-end that will interact with our smart contract and enable users to upload, sell and purchase NFTs.
References
Last updated